Super Admin Guide
Screenshots
Screenshots show demo data from a test environment.
As a Super Admin, you have the highest level of access in Billettsalg. This guide covers the tools and responsibilities unique to your role — the things only you can do.
Your Role
Super Admins operate at the system level — across all organizations, all users, and all events. You can do everything an Admin can within any organization, plus:
- Create and manage organizations
- Manage all users across the system
- Assign users to organizations and set their roles
- Promote or revoke Super Admin privileges
- Impersonate users for troubleshooting
INFO
For event management, member management, reports, and other organization-level features, see the Admin Guide. This guide focuses on the cross-organization tools only available to Super Admins.
Organization Management
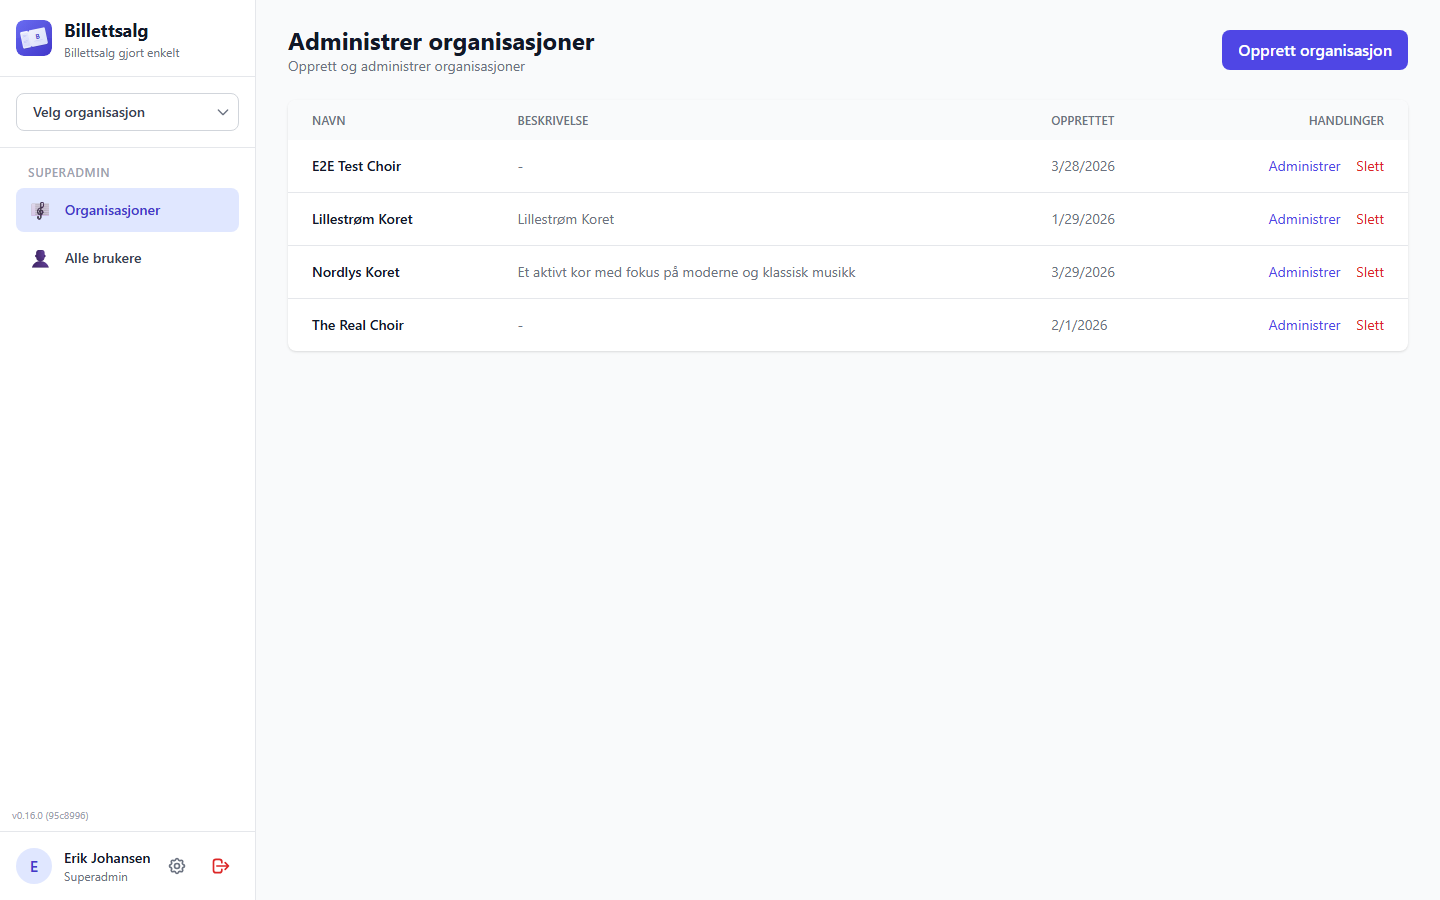
Navigate to Super Admin → Organizations (under the 🎼 Super Admin section in the sidebar) to manage all organizations in the system.
Viewing Organizations
The organizations page shows a table of all organizations with:
- Organization name
- Description
- Created date
- Actions — Manage and Delete
The organization name is also a quick-switch link. Click the name to make that organization your current one and go straight to its home page. Use Manage when you want the organization detail page instead.
Creating a New Organization
- Click Create Organization
- Enter the Organization Name (required)
- Optionally add a Description
- Click Save
The organization is created immediately. You can then add members to it from the Users page.
Managing an Organization
Click Manage on any organization to see its detail page. From there you can:
- View organization members and their roles
- Edit the organization display name — update the name that appears for this organization
- Edit organization settings
- See organization-specific data
Editing the display name:
- On the organization detail page, click Edit name next to the organization name.
- Enter the new display name (1–255 characters) and confirm the rename.
- Click Save.
Once saved, any organization record read afterward — the organization list, member views, reports — reflects the new name. Because you're editing another organization's name as a Super Admin rather than your own, there's no membership cache in your own session to refresh; admins and members of that organization pick up the new name the next time their own session refreshes (see below). The organization identifier and data storage remain unchanged; only the display name visible to users changes.
INFO
- People already signed in to that organization may keep seeing the old name in cached menus/labels until they refresh their session or sign in again.
- Existing invitation links keep showing the organization name that was current when they were created (point-in-time snapshot) — that doesn't change even when the invitation is later accepted.
- New invitations created after the name change use the updated display name.
- Changing the display name does not affect internal organization IDs, data partition keys, member lists, order/event history, or past feedback/notifications.
Deleting an Organization
Click the Delete button on an organization row and confirm. This removes the organization and its associations.
WARNING
Deleting an organization is a significant action that cannot be easily undone. Make sure all events are concluded and financial data has been exported before deleting.
User Management
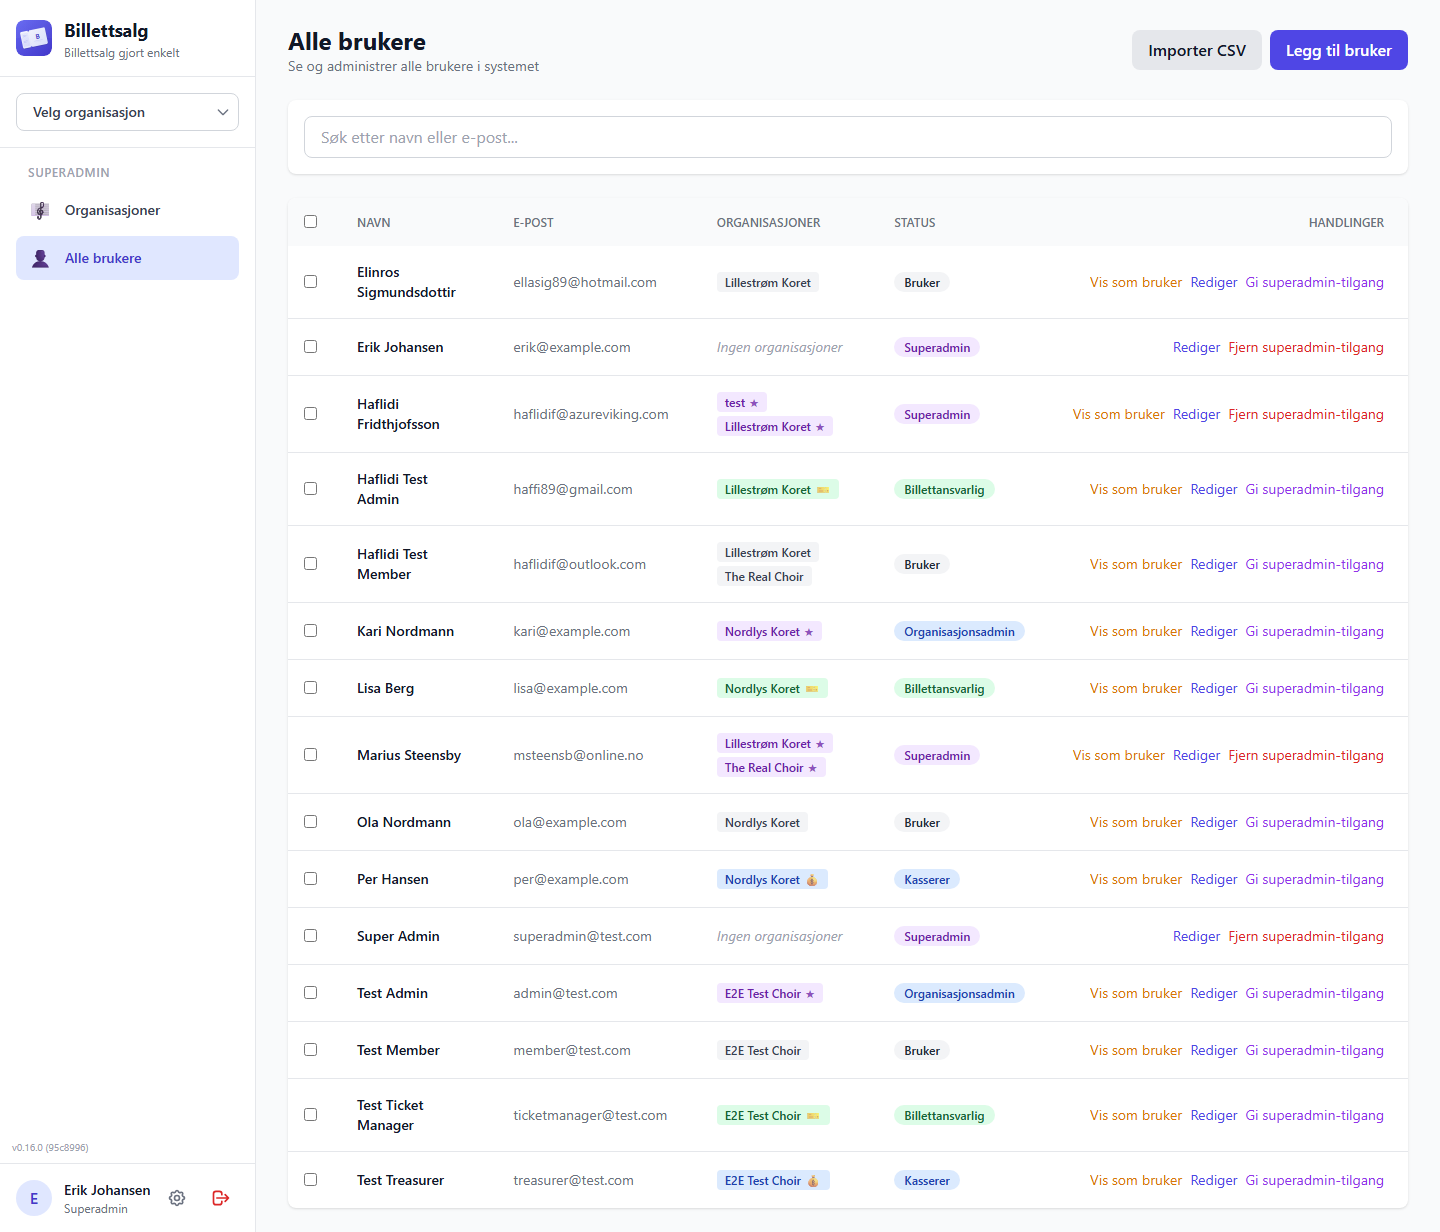
Navigate to Super Admin → All Users (under the 🎼 Super Admin section in the sidebar) to see every user in the system.
Viewing Users
The users table shows:
- Name and email
- Assigned organizations with their role in each (e.g. "Oslo Organization (admin)")
- Created date
- Super Admin badge — indicating whether the user has system-level access
Use the search box to filter users by name, email, or organization name.
Adding a New User
- Click Add User
- Enter their email (required) and name (required)
- Optionally assign them to an organization and select their role (Member or Admin)
- Click Add
CSV Import
For bulk user creation:
- Click Import CSV
- Download the template to see the expected format
- Prepare your CSV with user details
- Upload and review the import results
INFO
Both comma (,) and semicolon (;) separators are supported. Header rows are auto-detected.
Editing a User
Click the Edit button on a user row to open the edit dialog. You can update:
- First name and last name
- Phone (optional)
- Organization assignments — add or remove the user from organizations, and set their role in each organization (Member, Ticket Manager, Treasurer, or Admin)
Promoting / Revoking Super Admin
To make someone a Super Admin (or remove the privilege):
- Find the user in the list
- Click the Super Admin badge toggle in their row
- Confirm the action
WARNING
Super Admin access is powerful — it gives full control over every organization and every user. Only promote trusted individuals.
Assigning Users to Organizations
You can assign users to organizations in two ways:
Individual assignment:
- Click Edit on the user
- In the organization assignments section, add a new organization and select their role
- Save
Bulk assignment:
- Select multiple users using the checkboxes
- Click the Bulk Assign to Organization action
- Choose an organization and role
- Confirm
Bulk Operations
Select multiple users with the checkboxes (or use Select All for the current filtered view), then:
- Bulk assign to organization — Add all selected users to an organization with a specific role
- Bulk delete — Remove all selected users (with confirmation showing the count)
WARNING
Bulk delete cannot be undone. Double-check your selection before confirming.
Impersonation
Impersonation lets you see the app exactly as another user sees it — their events, orders, history, and permissions. It's your go-to tool for troubleshooting when a user reports a problem.
What It Is
When you impersonate a user, the app switches to show their data — their events, orders, history, and permissions. You see what they see, in the context of their organization and role.
Use responsibly
All impersonation sessions are logged and audited. Every action you take while impersonating is recorded with your admin identity. Use this feature only for legitimate support and troubleshooting purposes.
When to Use It
- A member reports they can't see their orders → impersonate them to check
- Verifying that a new member's setup looks correct
- Debugging role permission issues
- Confirming what data a specific user can access
How to Start Impersonation
- Go to Super Admin → All Users
- Find the user you want to view as
- Click the Impersonate button (👤) in their row
- If the user belongs to multiple organizations, select which organization context to use
- You'll be redirected to the home page, now viewing as that user
The Impersonation Banner
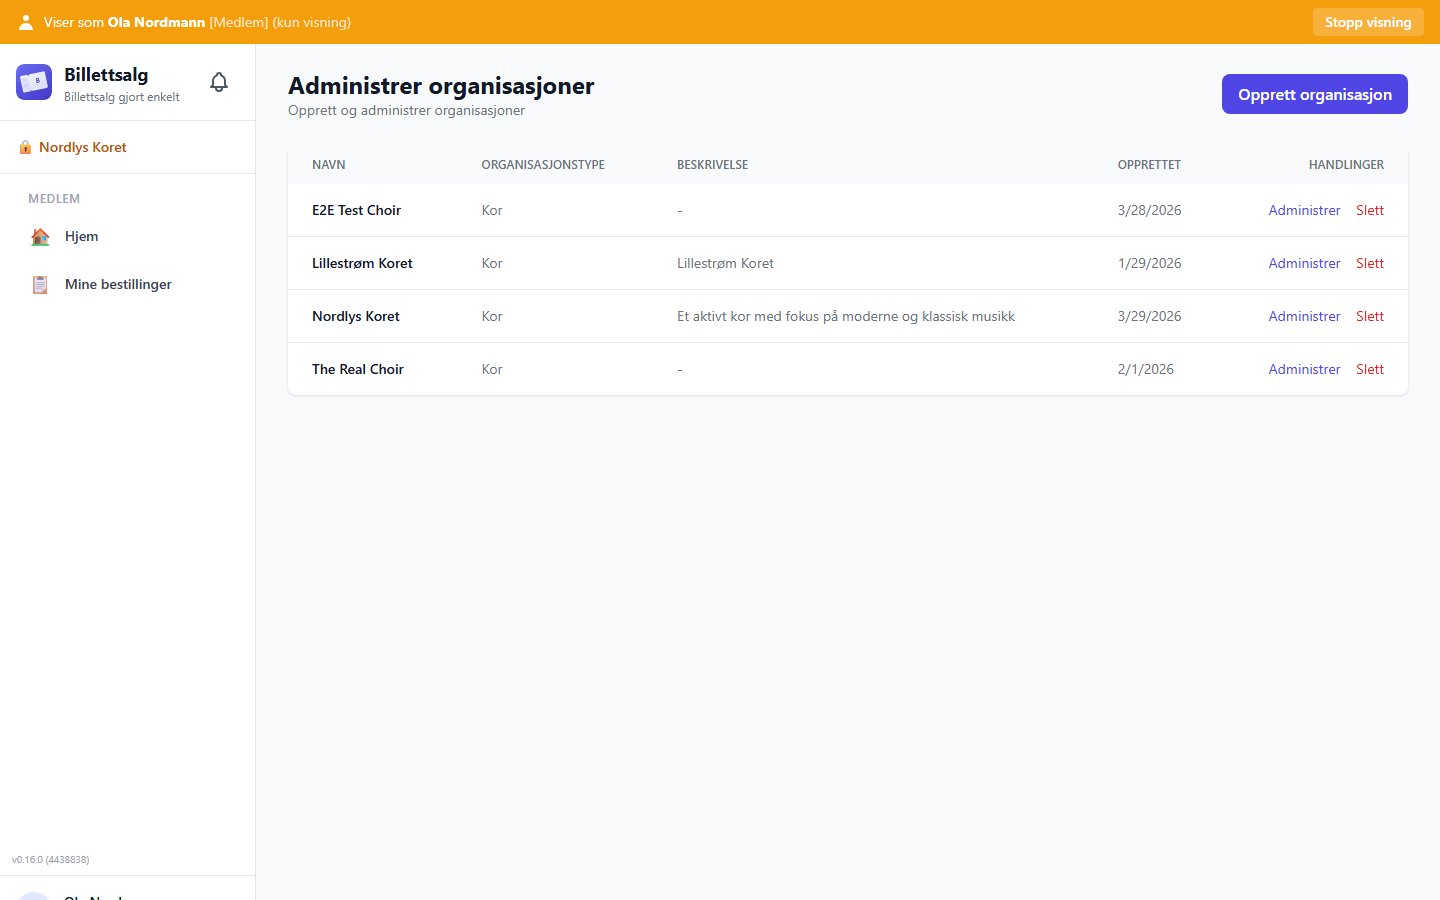
While impersonating, a prominent banner appears at the top of the screen:
"Viewing as [User Name]" — view-only
This banner is always visible as a reminder that you're in impersonation mode. A notice also reminds you that actions like ordering tickets are disabled — impersonation is view-only.
Stopping Impersonation
Click Stop Viewing in the impersonation banner to return to your own account. You'll be taken back to the Super Admin view.
What's Logged
Every impersonation session creates an audit record with:
| Field | Description |
|---|---|
| Admin | Who initiated the impersonation (you) |
| Target user | Whose account was viewed |
| Start time | When the session began |
| Stop time | When the session ended |
| Session ID | Unique identifier for the session |
| Action | Start or stop event |
Audit Logs
Navigate to Super Admin → All Users and review impersonation history to see a record of all impersonation sessions.
What's Tracked
The audit trail records:
- Which Super Admin started the impersonation
- Which user was impersonated
- The target user's email and role at the time
- Session start and stop timestamps
- Total session duration
- A unique session ID linking the start and stop events
INFO
Audit logs are written automatically — you don't need to do anything to enable them. They're created as fire-and-forget events, so even if the logging service has a brief hiccup, your impersonation session isn't affected.
Tips for Super Admins
Setting up a new organization
- Create the organization from Super Admin → Organizations
- Add or assign users from Super Admin → All Users
- Promote one user to Admin role within that organization
- The new Admin can then create events and invite members
Quick troubleshooting workflow
- User reports a problem
- Find them in Super Admin → All Users
- Impersonate to see what they see
- Stop impersonation
- Fix the issue (role change, organization assignment, etc.)
- Confirm with the user
Need Help?
- Admin features — See the Admin Guide for event management, members, reports, and more
- Getting started — See Getting Started for login help and role overview
- Technical issues — Check the Architecture Reference for system details