Admin Guide
Screenshots
Screenshots show demo data from a test environment.
As an Admin, you're in charge of the day-to-day running of your organization's ticket sales. This guide walks you through every tool at your disposal — from creating events to tracking sales and managing members.
Your Role
Admins manage everything within their organization: events, members, ticket sales, and reporting. You inherit all the capabilities of the Treasurer, Ticket Manager, and Member roles — so you can also approve orders, manage allocations, view reports, and order tickets yourself.
Your key responsibilities:
- Create and configure events with showtimes and ticket types
- Add and manage members
- Monitor sales from the dashboard
- Record direct sales and free tickets
- Export reports for your treasurer or board
Dashboard
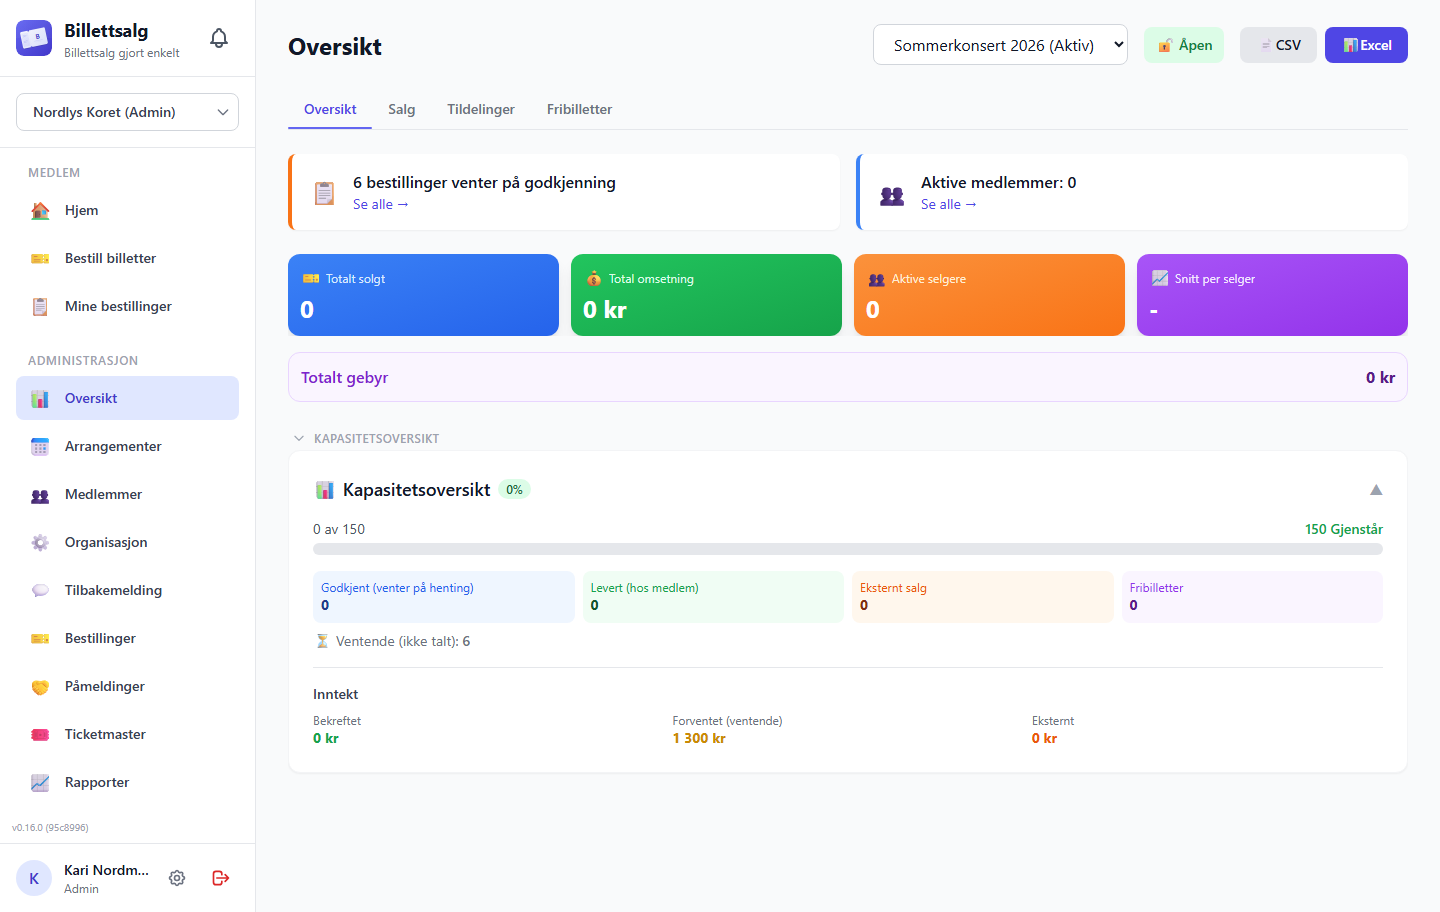
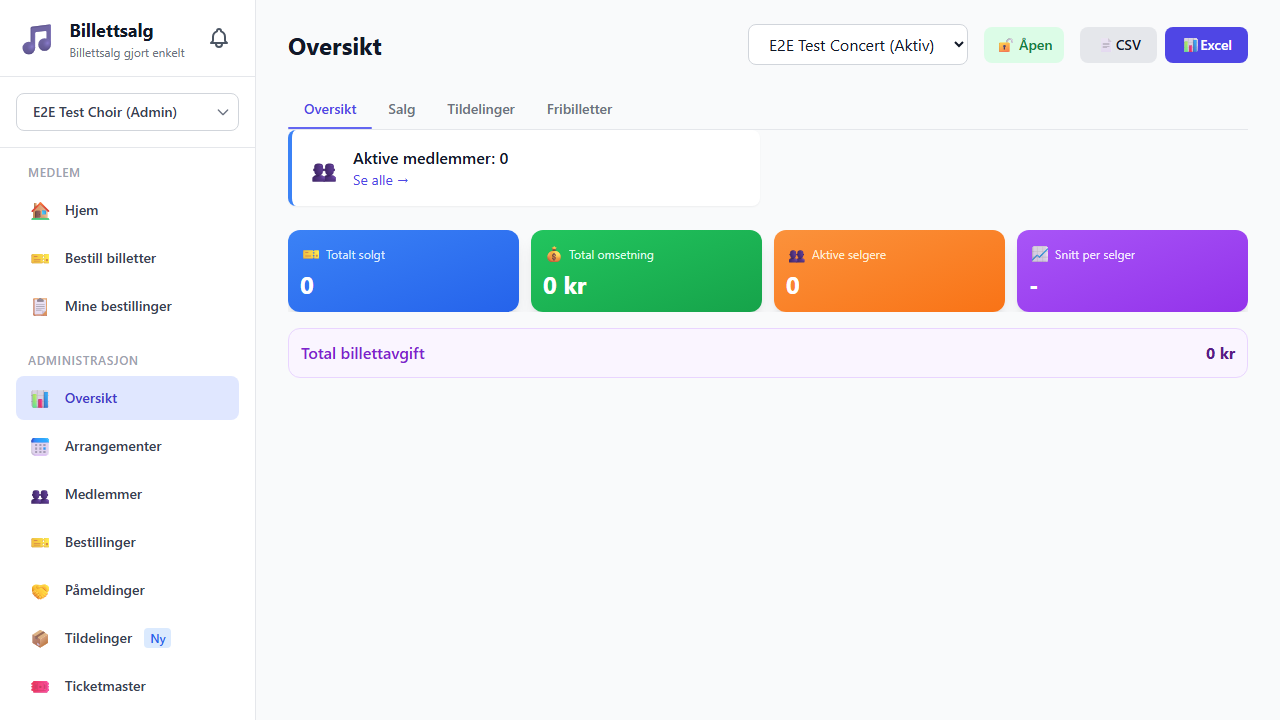
The dashboard is your command centre — a live overview of how ticket sales are going. Navigate to Management → Dashboard to get started.
The dashboard is organised into four tabs — click a tab to switch between views: Overview, Allocations, Free Tickets, and Sales.
Event Selector
Use the dropdown at the top to switch between events. The dashboard auto-selects your active event when you first arrive.
Overview Tab
The Overview tab is your at-a-glance summary with stats cards and capacity information.
Stats Cards show:
- Total orders — number of ticket orders across all statuses
- Tickets sold: actual reported sold quantities only. Approved or delivered issued tickets are not counted as sales or revenue. Returned and outstanding tickets contribute zero.
- Revenue — total value of committed sales
- Capacity — how many tickets are left
Capacity Overview — For each showtime, you'll see a breakdown of how capacity is used:
| Category | Counts toward capacity? |
|---|---|
| Approved orders (awaiting pickup) | ❌ No |
| Delivered but unsold orders | ❌ No |
| Reported sold printed tickets | ✅ Yes |
| External sales (Ticketmaster, etc.) | ✅ Yes |
| Free tickets (complimentary) | ✅ Yes |
| Pending orders (not yet reviewed) | ❌ No |
INFO
Pending, approved, returned, and outstanding printed tickets do not consume capacity. Reported sold tickets consume capacity.
Sales Lock — Use the lock toggle to open or close sales for an event. When locked, members cannot place new orders. The lock status is shown with a coloured indicator — green for open, red for locked.
Export — From the Overview tab, you can export data in two formats:
- CSV — Lightweight comma-separated file
- Excel — Formatted spreadsheet (supports Norwegian and English)
Sales Quotas Tab
The Sales Quotas tab appears when you've enabled sales quotas for the event (see Creating a New Event). It shows how ticket quotas are distributed across members — total allocated, used, and remaining.
When creating or editing an event, you can enable sales quotas to limit how many tickets each member can order. This is useful for high-demand events where you want fair distribution.
Registration Round Management — Registration rounds let you gauge member interest before setting quotas.
- Open a round — Set a deadline and members can pledge how many tickets they're confident about ("sure") and how many they might sell ("possible")
- Close the round — Stop accepting new pledges
- Convert pledges to sales quotas — Turn the "sure" pledges into actual ticket sales quotas
TIP
Opening a registration round is optional. You can skip straight to manually setting quotas if you prefer.
Free Tickets Tab
The Free Tickets tab gives you a dedicated space to manage complimentary tickets — for sponsors, conductors, VIP guests, press, or contest winners. Select the showtime, ticket type, and quantity to add free tickets. See the Free Tickets section below for full details.
Sales Tab
The Sales tab provides visual charts showing sales trends and a member-level sales table. Use it to see which members are selling, track revenue over time, and drill into individual sales details.
If you've invited any selling partners to this event, the Sales tab also shows a Sales by Selling Partner table — tickets each partner organization sold on your behalf, with quantity and revenue per partner. These are settled with the partner organization directly and are never counted as member sales.
Event Management
Event Lifecycle
Events go through several states:
| State | Icon | What it means |
|---|---|---|
| Active | ✅ | Event is visible to members, sales are open |
| Sales Locked | 🔒 | Event is visible but no new orders can be placed |
| Inactive | ❌ | Event is hidden from members |
| Deleted | 🗑️ | Soft-deleted, can be restored by admin |
Use the lock/unlock button on the dashboard to control sales without deactivating the entire event. This is useful when you need to pause sales temporarily (e.g., while reviewing orders).
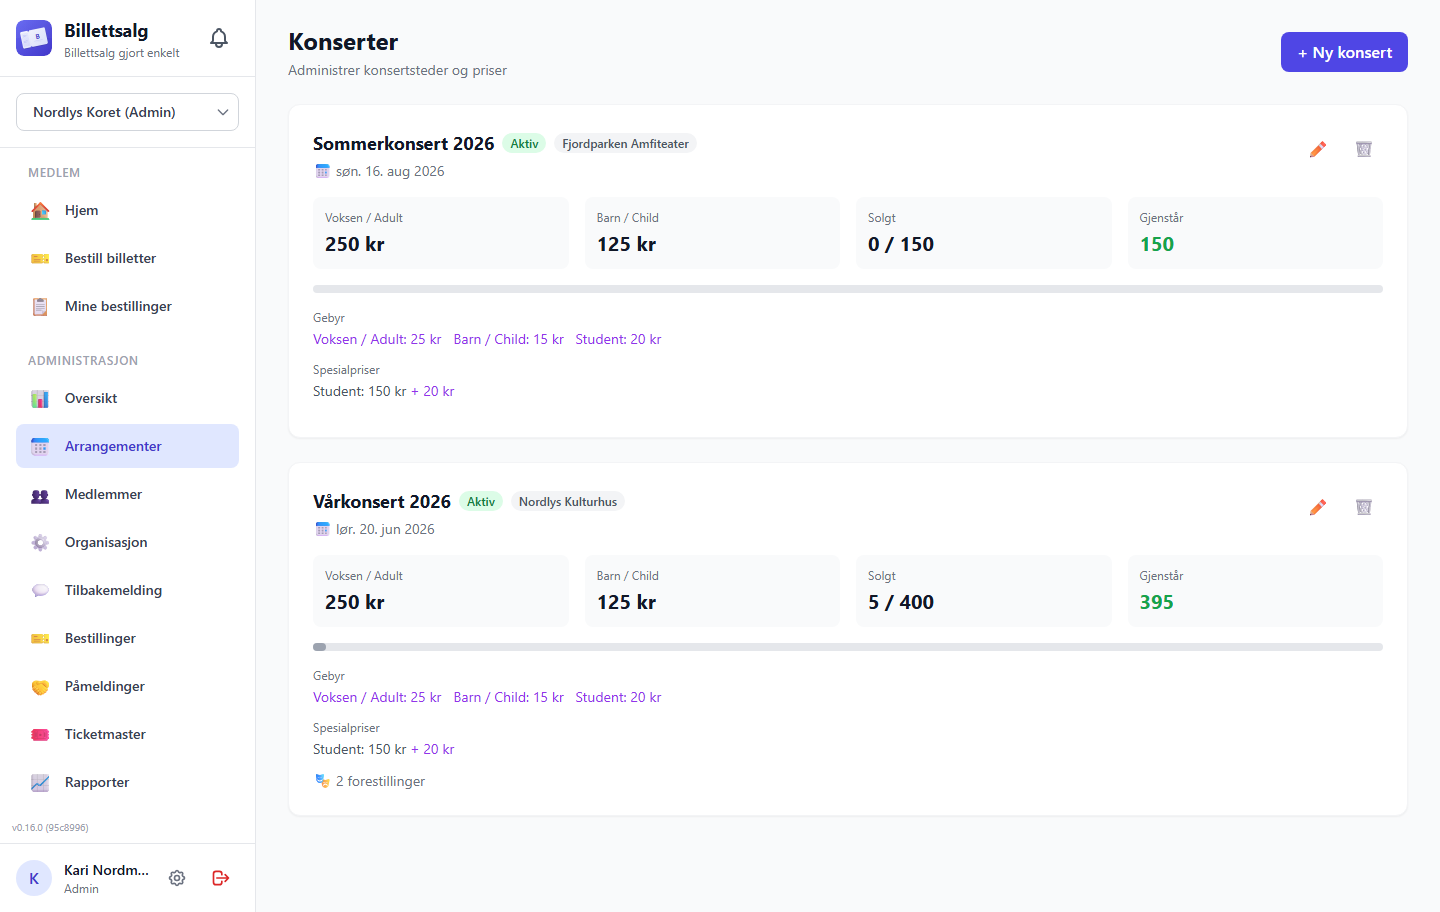
Navigate to Management → Events to see all your organization's events.
Creating a New Event
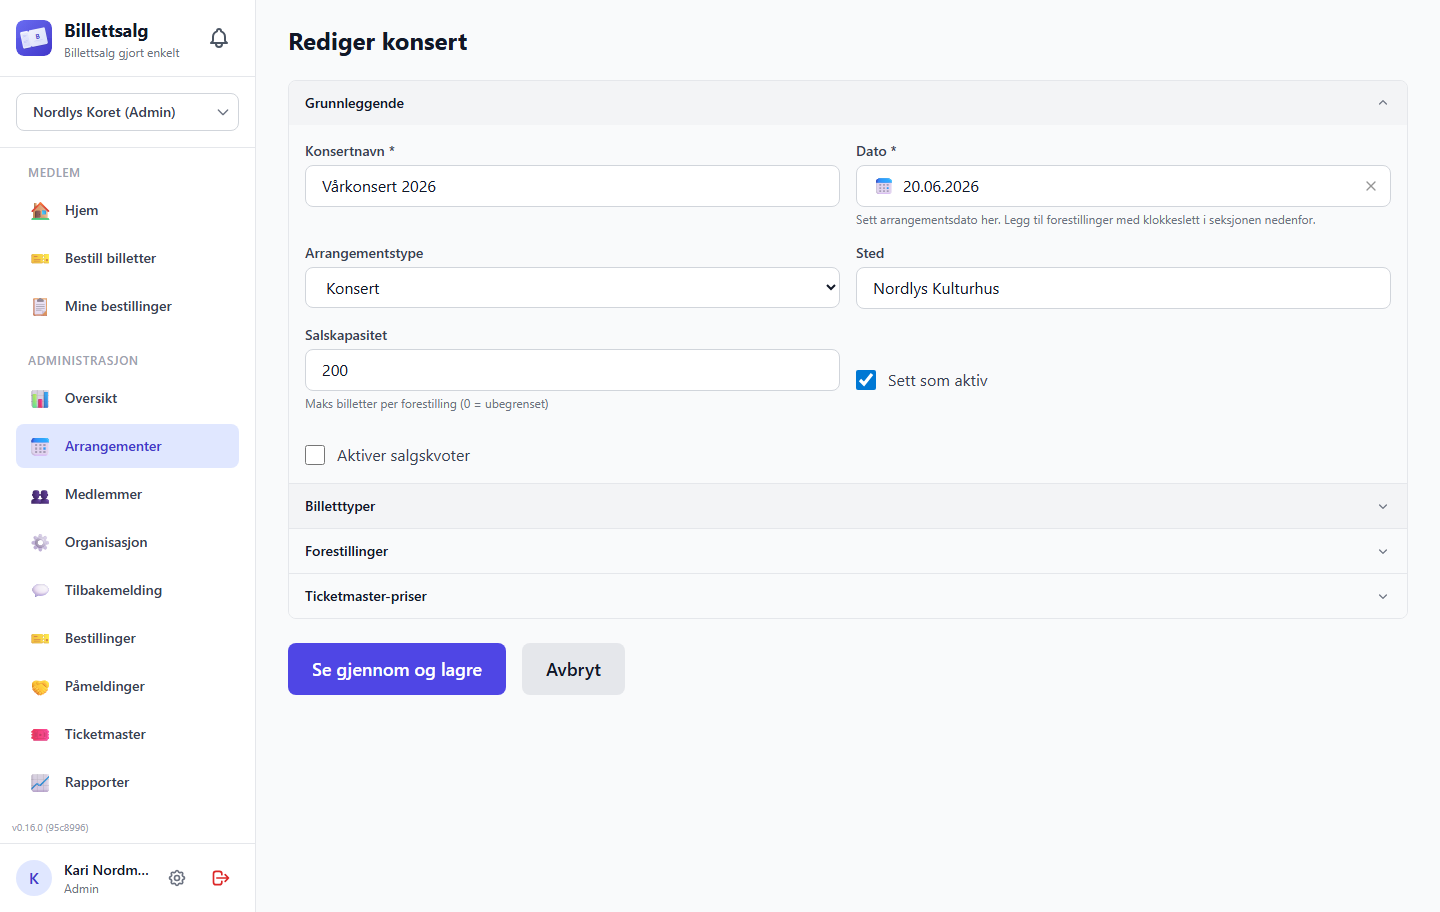
The event form uses an accordion layout — each section can be expanded or collapsed. Click a section header to open it. Only the Event Basics section is expanded by default; the others start collapsed so you can focus on one step at a time.
Validation badges
If a section contains validation errors, a red badge appears on its header showing the number of issues. Click the section to expand it and fix the errors.
- Click Create Event
- Event Basics (open by default) — fill in the event details:
- Event Name (required) — e.g. "Spring Concert 2025"
- Event Date (required)
- Location (optional)
- Venue Capacity — maximum tickets per showtime (set to 0 for unlimited)
- Enable sales quotas — toggle on if you want to limit how many tickets each member can order (see Sales Quotas Tab)
- Ticket Types — expand this section and add at least one ticket type (see below)
- Showtimes — expand to add performance dates and times
- Ticketmaster Pricing — expand if you sell through Ticketmaster to set separate prices
- Review your event in the preview, then click Save
Ticket Types
Every event needs at least one ticket type. Expand the Ticket Types section in the accordion, then for each type set:
- Name — e.g. "Adult", "Child", "Student"
- Price — in NOK (e.g. 250)
- Fee — optional handling fee added to the ticket price (e.g. 25). The fee is added to the ticket price. Buyer pays: price + fee.
Quick-add presets: Use the preset buttons to quickly add common ticket types:
| Preset | Price | Fee |
|---|---|---|
| Student | 150 kr | 10 kr |
| Senior | 200 kr | 25 kr |
| Special | 85 kr | 15 kr |
You can customise the name and price after adding a preset. You must always have at least one ticket type.
Ticketmaster Pricing
If you sell through Ticketmaster as well, expand the Ticketmaster Pricing section in the accordion to set separate prices and fees for that channel. This section is collapsed by default — you only need it if your organization uses Ticketmaster.
Showtimes
Expand the Showtimes section to add one or more showtimes to your event. For each, set the date and time and an optional label (e.g. "Matinée" or "Evening"). Showtimes are automatically sorted by date.
If you don't add any showtimes, the event will have a single performance based on the event date.
Editing an Event
Click the edit icon (✏️) on any event card to update its details. All fields are editable — name, date, ticket types, showtimes, and capacity.
Selling Partners
You can invite another organization to sell tickets on your behalf for a normal (non-Shared) event. This is delegated selling, not co-ownership: the partner's own members order tickets for your event through their own organization's normal Home and Bestill billetter screens, and the partner's ticket manager approves and delivers those self-service orders — it never gets any of the shared-management authority a Shared Event co-organizer has. The partner cannot cancel, refund, transfer, reconcile, invoice, archive, or change any configuration on your event; reconciliation, invoicing, and settlement stay with you. A partner staff member can still record an order manually (e.g. a cash sale at rehearsal) as a secondary, compatibility path, but self-service ordering by the partner's own members is now the primary flow.
Save-before-invite
For a new event, the Selling partners section lets you stage partner organizations before you save — nothing is invited yet. The first invitation is only sent once the event itself has been saved and has a real ID. For an event you're already editing, every partner you add is invited immediately.
- Open the event's create or edit form. Scroll to the Selling partners card below the event details.
- Identify the partner — how depends on your role:
- Organization admins (the normal case) enter the email address of an administrator in the partner organization and click Add. You never see or enter an organization ID.
- Super admins instead get an organization search box — search by organization name and select the partner from the results, the same picker used for Shared Event participants. Eligibility is minimal by design: the organization must be active (not soft-deleted) and not your own — there's no separate partnership approval step.
- On a new, unsaved event — the partner is staged locally with a "will be invited on save" note. Save the event to send the actual invitations.
- On an already-saved event — the invitation is sent immediately, and a one-time invitation link appears inline. Copy it and send it to the partner (it is never shown again — not even in the partner's own notification).
If you can't find or confirm a partner by email
For privacy, the server never confirms whether an email address belongs to an account, an admin, or an eligible organization — an unknown address, a non-admin address, an ineligible organization, your own organization's address, and an address that administers more than one eligible organization all produce the exact same generic message. If adding a partner by email doesn't work, double-check the address directly with the partner organization; there's no more specific error to go on.
A duplicate invite for a partner your organization has already invited (organization-search path) is rejected client-side before it's even sent. On the email path, a repeat invitation to the same partner is simply idempotent — the server recognizes the existing delegation and doesn't create a second one.
Multiple invites and partial failure: invitations are sent one at a time. If you invite several partners and one fails, the partners that already succeeded stay invited — the event save itself is never rolled back or blocked by a failed invitation. Each failed partner appears with a Retry control so you can resend just that one.
Delegation status:
| Status | Meaning |
|---|---|
| Invited | Partner has been invited but has not yet accepted or declined |
| Active | Partner accepted and can currently sell for this event |
| Declined | Partner declined the invitation |
| Revoked | You revoked a delegation that was invited or active |
The partner accepts or declines from its own side; there is no owner-side accept/decline action. You can Revoke an invited or active delegation at any time — revoking requires a short reason and takes effect immediately, even if the reverse-index update the partner's own list relies on is still catching up. Once revoked, the partner immediately loses the ability to create new orders, approve or deliver pending member self-orders, or report sold/returned on its existing orders for this event; any orders it already delivered remain in your organization's records. Revoking is permanent — invite the partner again if you want to restore access, which is treated as a brand-new delegation.
Deactivating the event, or locking its sales, is a new-sales control rather than a revocation. A deactivated event disappears from the partner's members' catalog and refuses new delegated orders; a sales lock refuses new orders while the event stays visible. Neither one freezes the orders the partner already holds: while the delegation is still active, the partner can still approve, deliver, cancel a pending order, and report sold/returned, so tickets are never stranded mid-lifecycle. Revoking the delegation, or deleting the event, are the levers that end the partner's access outright.
Copy invitation links before leaving the page
An invitation link is minted once and never shown again. If you navigate away before copying a freshly created link, you'll need to revoke and re-invite that partner to get a new one.
Deleting and Restoring Events
Click the delete icon (🗑️) on an event card. This performs a soft delete — the event is hidden from normal view but not permanently removed.
To see deleted events, expand the Deleted Events section at the bottom of the page. From there, you can Restore any event to bring it back.
WARNING
Deleting an event does not cancel existing orders. Make sure you've handled any pending orders before deleting.
Event Cards at a Glance
Each event card shows:
- Event name and date
- Location badge
- Active status badge
- Ticket pricing grid (first two types shown, plus totals)
- Coloured progress bar showing how full the event is
- Number of showtimes
Member Management
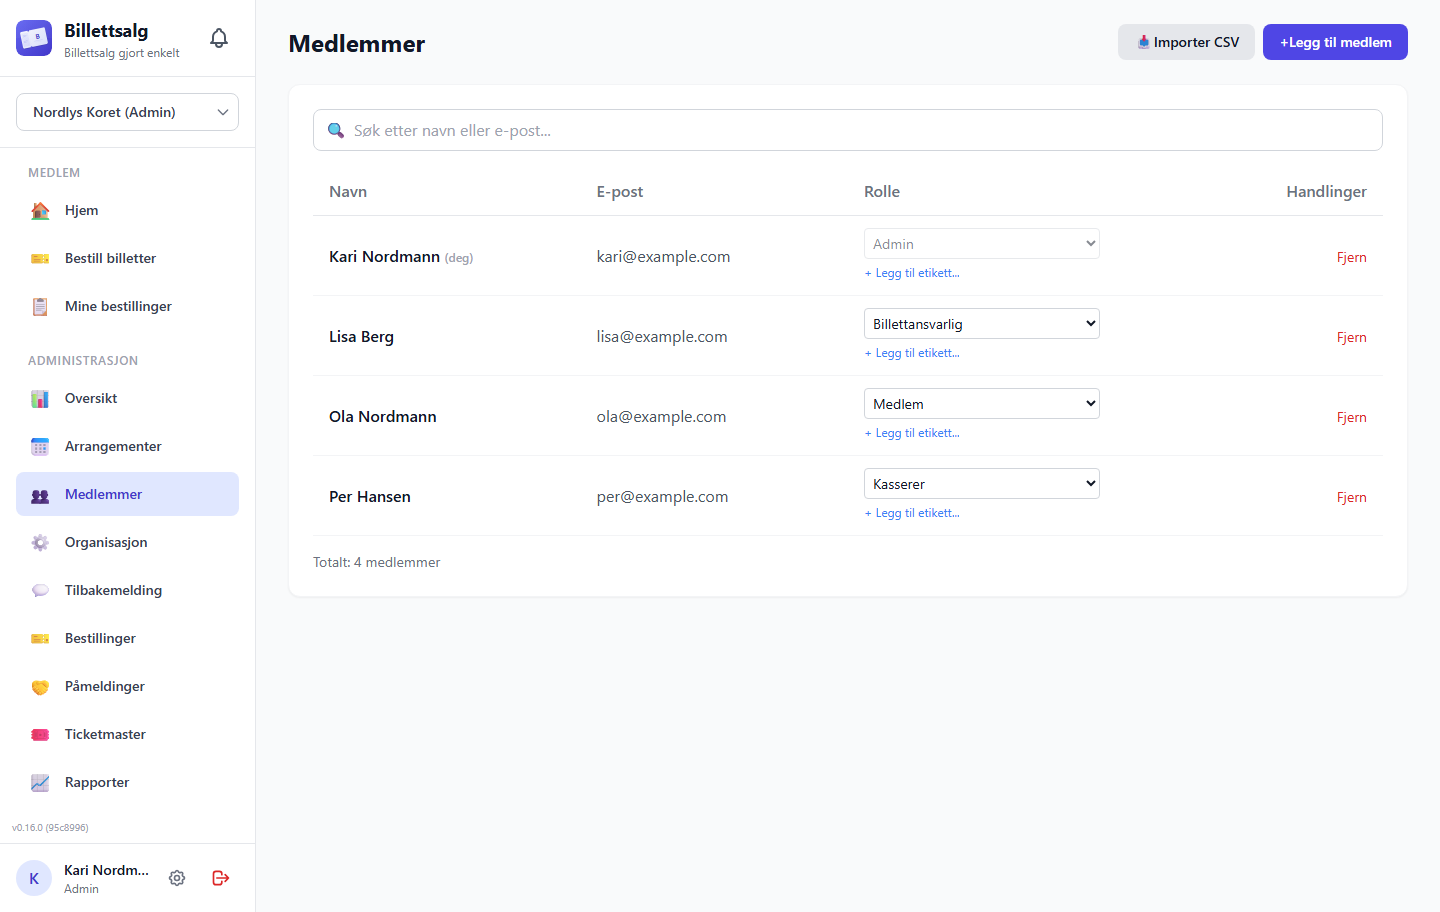
Navigate to Management → Members to manage your organization's members.
Viewing Members
The members page shows a clean table of everyone in your organization with their name, email, and current role. The table is the main view — adding members and importing are handled through separate slide-up panels.
Adding a Single Member
- Tap the Add Member button
- A BottomSheet (slide-up panel) opens with the add-member form
- Enter their email and name
- Choose a role: Member, Ticket Manager, Treasurer, or Admin
- Tap Add
- The panel closes and the table updates
The member will be able to log in with a magic link to that email address.
CSV Import
For adding many members at once:
- Tap the Import CSV button
- A separate BottomSheet (slide-up panel) opens with the import workflow
- Download the template to see the expected format
- Prepare your CSV file with columns:
email,name,role - Upload the file
CSV format
- Both comma (
,) and semicolon (;) separators are supported - Role values:
member,ticketmanager(orbillettansvarlig),treasurer(orkasserer),admin - Header row is auto-detected
After import, you'll see a summary: how many succeeded, how many failed, and any error details.
Changing Roles
Use the role dropdown next to each member to change their role. Changes take effect immediately.
WARNING
You cannot change your own role or remove yourself from the member list. Ask another admin to make changes to your account.
Removing Members
Click the delete button next to a member and confirm. This removes them from the organization — they'll no longer be able to access organization events or place orders.
Invitations
Instead of manually adding members, you can create an invitation link:
- Create an invitation from the admin panel
- Set an optional expiry date and usage limit (0 = unlimited)
- Share the link with prospective members
- When someone clicks the link, they enter their name and email, and are automatically joined to the organization
Direct Sales (Registrations)
Sometimes you need to record a sale directly — a walk-up buyer at the door, a phone order, or tickets sold through a channel that isn't tracked automatically. That's what registrations are for.
How Registrations Work
Unlike regular orders (which go through the approval flow), registrations are recorded immediately. They count toward capacity right away.
Creating a Registration
From the dashboard or orders page, create a registration by selecting:
- The showtime
- The ticket type and quantity
- Any relevant notes
The 1-Hour Grace Period
After creating a registration, you have 1 hour to edit or delete it. After that, the registration is locked to prevent accidental changes.
WARNING
Once the 1-hour grace period expires, the registration cannot be modified or deleted. Double-check the details before moving on to other tasks.
Reports & Export
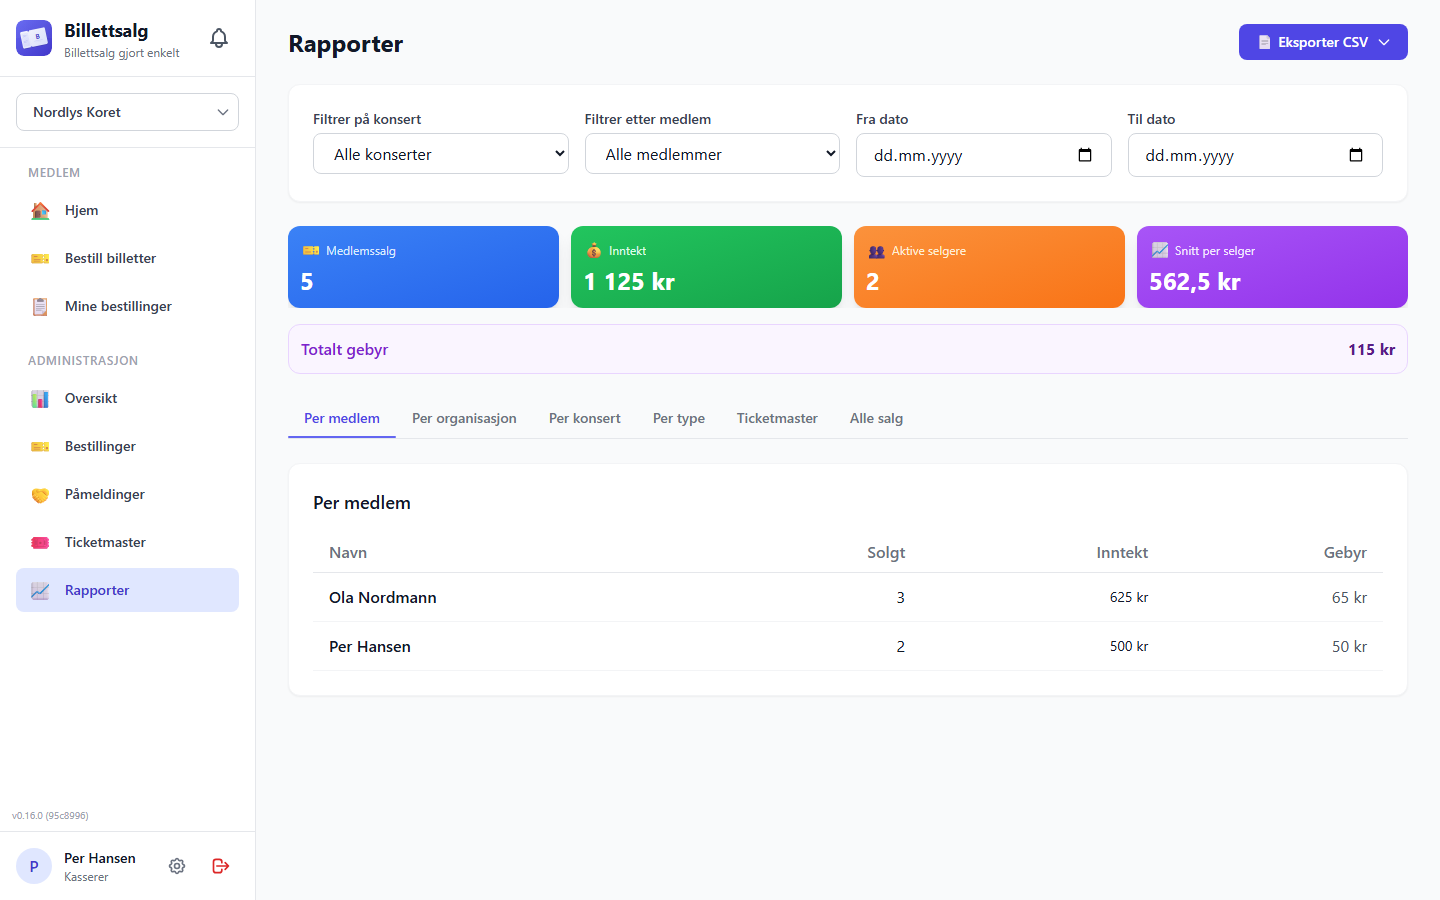
Navigate to Management → Reports to access financial data. (This feature is available because Admins inherit Treasurer capabilities.)
Report Tabs
The reports page has six tabs, each offering a different view. Tabs use lazy loading — data is only fetched when you click a tab, keeping the page fast even with large datasets.
| Tab | What it shows |
|---|---|
| Members | Tickets sold, revenue, and fees per member |
| Organizations | Summary by organization (useful for multi-organization setups) |
| Events | Revenue breakdown per event, including external sales |
| Ticket Types | Sales and revenue grouped by ticket type |
| Ticketmaster | External sales from Ticketmaster by showtime |
| All Sales | Every individual sale with full details |
Filtering
Narrow down the data with:
- Event dropdown — show data for a specific event
- Member dropdown — show data for a specific member
- Date range — from / to date pickers
Filters apply across all tabs and update automatically.
Exporting Data
Click the Export button and choose from:
- Transactions — All individual sales
- Members — Summary per member
- Showtimes — Breakdown by showtime
- Orders — All orders with status
Exports are in CSV format. The filename includes a timestamp so you can keep track of versions.
Selling Partner Attribution in Reports
If any event has selling partners, their sales are tracked separately from your own members' sales throughout the app:
- Order lists show a "Sold by {partner organization}" badge on any order a partner created (or a generic "Delegated sale" badge if the partner's name can't be resolved).
- The Members report tab shows a dedicated Selling Partners table below the member rows, with tickets sold, revenue, and fee per partner organization — excluded from the member rows above it.
- The Transactions CSV export includes a "Solgt av partner" (sold by partner) column, and the Members CSV export includes a separate partner-organization summary section.
- Excel exports label the equivalent section "By Partner Organization".
What this shows and doesn't show: every one of these surfaces names the partner organization, never a partner staff member's name or email. Partner staff identity and the partner's original buyer information are recorded internally as an audit trail visible only to your organization's Ticket Managers, Treasurers, and Admins (for example, on an order's transfer history) — an ordinary member never sees another organization's staff or buyer details, only the organization name on orders and reports.
Member Sales Detail
Click on any member's name in the Members tab (or from the dashboard) to see their individual sales breakdown:
- Total tickets sold and total revenue
- Each registration with ticket type, quantity, unit price, and date
- Invoice summary: shows waiting for settlement, invalid basis, ready, partial, or invoiced state
Issuing member invoices
After printed orders are settled and have a valid sold-only invoice basis:
- Open the member sales detail or the dashboard Sales tab.
- Review the invoice amount and any waiting or invalid orders.
- Select Mark as Invoiced to record that the invoice was issued or sent.
- Confirm the action.
The action covers all eligible active direct registrations and settled printed orders for that member and event. Returned tickets are excluded. Once every eligible record is marked, selecting the action again removes invoice state from those eligible records even if separate unresolved or invalid-order warnings remain. Invoiced does not mean the invoice was paid.
Overriding archive prerequisites
Normal archive requires a settled order to have a valid invoice basis and an issued invoice. Bulk archive never overrides these checks. As an organization admin, you can explicitly confirm an override for one settled order with a missing invoice, an invalid legacy basis, or both. The app records your identity, name, time, archive time, and exact blockers. Ticket Managers and Treasurers cannot use this override.
Free Tickets
Free tickets are complimentary tickets for sponsors, conductors, VIP guests, press, or contest winners.
Free tickets now have their own dedicated Free Tickets tab on the Dashboard, making them easier to find and manage.
Adding Free Tickets
From the Dashboard, switch to the Free Tickets tab:
- Add a free ticket entry with:
- Recipient name
- Reason (e.g. "Sponsor", "Conductor", "Press")
- Showtime, ticket type, and quantity
- Save
Editing Free Tickets
Click an existing free ticket entry in the Free Tickets tab to open the same bottom sheet in edit mode. You can change the showtime, ticket type, quantity, recipient, and reason, then click Save Changes. Use the trash icon on the entry only when you want to remove it.
When you create a new complimentary ticket that applies at the event level rather than one specific performance, select Applies to all showtimes. The showtime selector is hidden, and the app saves the new entry without a showtime. If you edit an existing free ticket that already has a showtime, this option does not clear that showtime; choose a different showtime or delete and recreate the entry if you need to change its scope.
How They Affect Capacity
Free tickets count toward capacity but do not count as revenue. This ensures your venue doesn't get overbooked, while keeping revenue figures accurate.
INFO
Free tickets appear in the capacity overview alongside member orders and external sales.
Tips for Admins
Typical concert timeline
- 4 weeks before — Create the event, open orders
- 2 weeks before — Close orders, prepare tickets
- 1 week before — Distribute physical tickets at rehearsal
- Concert week — Perform!
- 1 week after — Members register final sales, collect money
- 2 weeks after: Issue member invoices, then export final reports
Quick actions from the dashboard
You can lock/unlock sales, export data, manage free tickets, and run commitment rounds — all without leaving the dashboard.
Organization Settings
Editing the Organization Display Name
As an Admin, you can update your organization's display name to reflect changes in how you're known.
- Navigate to Management → Organization (if available in your Admin menu).
- Click Edit name next to your organization name.
- Enter a new display name (1–255 characters) and confirm the rename.
- Click Save.
Once saved, the new name is used for any organization record read afterward — for example, if you reload the page or another admin opens the organization settings, they will see the new name. Your own browser session is refreshed automatically right after saving, so you should see the new name everywhere in your own session immediately; if that automatic refresh fails, reload the page. The organization's internal identifier and stored data remain unchanged — only the display name changes.
INFO
- Other people who are already signed in (other tabs, other admins) may keep seeing the old name in cached menus/labels until they refresh or sign in again.
- Existing invitation links keep showing the organization name that was current when they were created — that snapshot does not update, even after someone accepts the invitation.
- Newly created invitations use the updated display name.
- Changing the display name does not affect member accounts, event history, financial records, or past feedback/notifications, which keep referencing whatever name was current at the time.
Need Help?
- Something not working? Check with your Super Admin — they can view your account and troubleshoot issues
- Need a higher role? Ask your Admin to update your permissions from the Members page
- Technical issues? Contact your system administrator